II - Creating a token server, STS, API using .net 6, MySql and Duende Identity Server


Brief Overview of CAT
Many modern applications adopt a CAT architecture, which is a great way to provide a compact, modular and flexible infrastructure to run a variety of apps.
CAT-> Client, API, Token Service. The following diagram explains the basic concept and structure employed for one of our projects that uses ASP Identity to store user data.
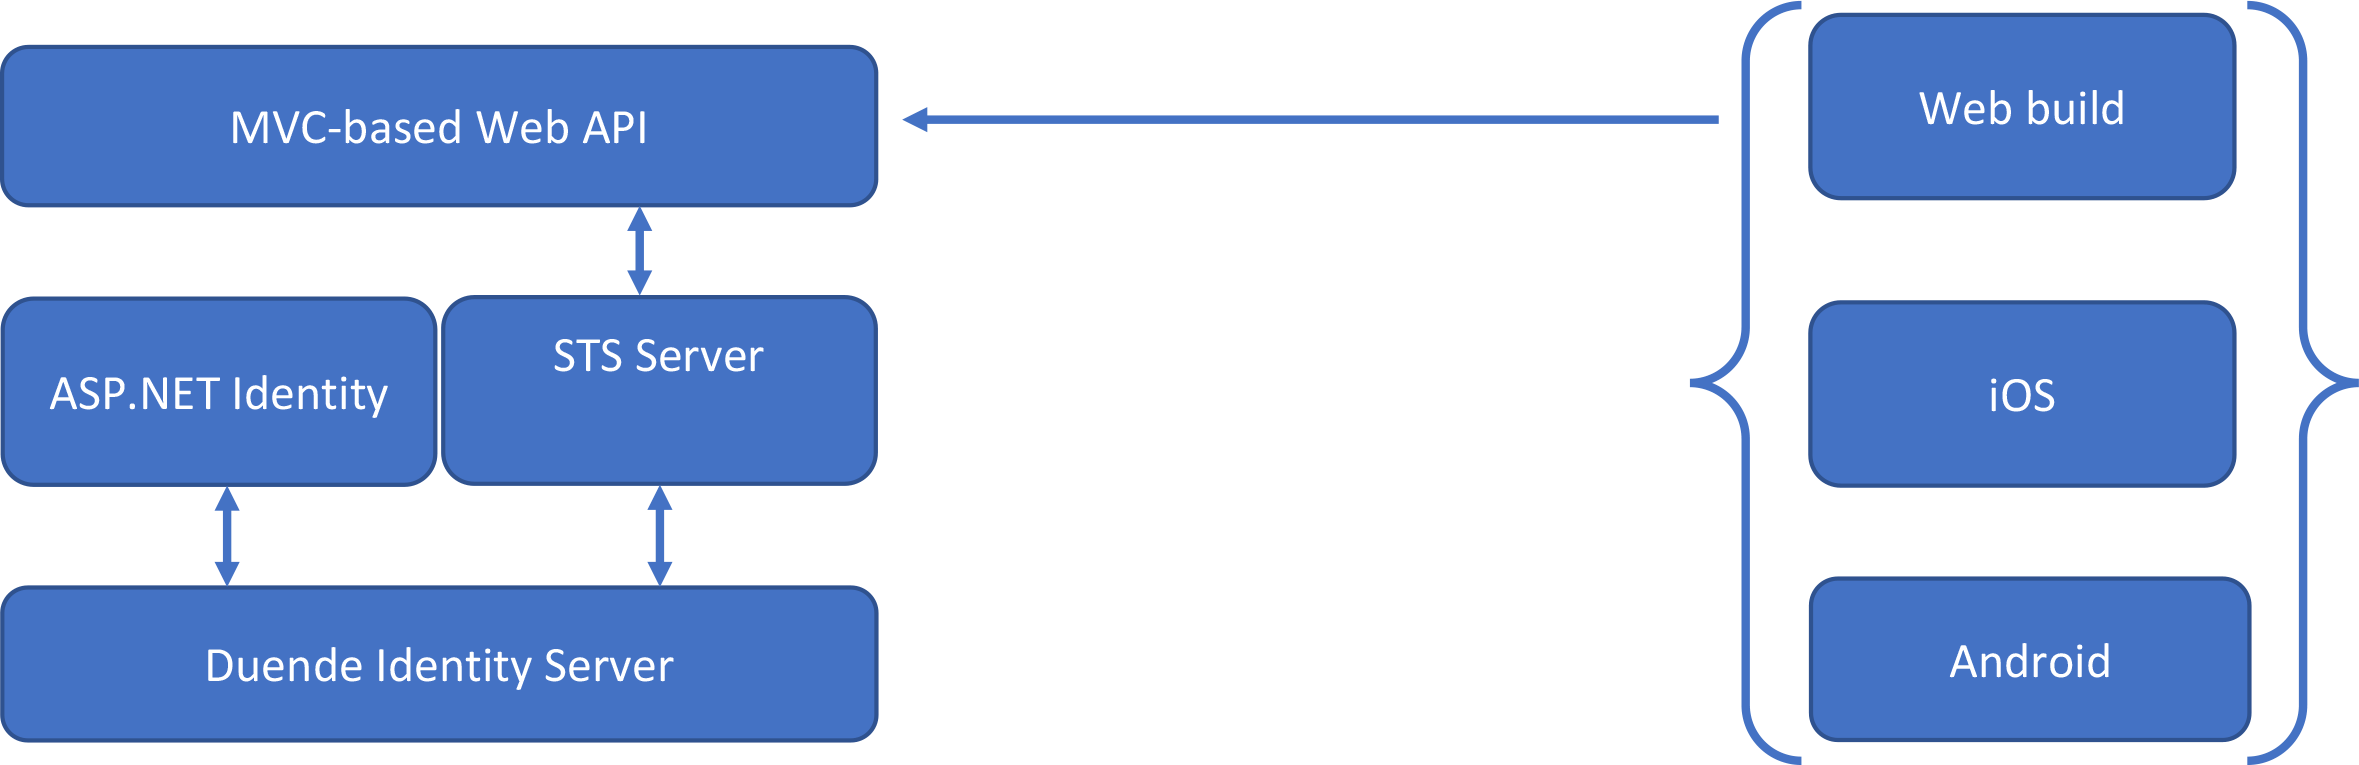
A Client in this case is represented by the blocks that are names Web build, iOS, and Android. A client makes an API call to the Web API Resource and provides a token along with it. The API checks the token with the Security Token Service Server, if the token is expired or if the user is not authorized to perform the call then the API call will return an error unauthorized. Otherwise, the API will serve data. In this case, we are employing ASP.NET identity to store the user data over .net 6 with Duende for an Identity Server. We are also employing angular with native script to be able to build Web, iOS, and Android with a shared code repository. The DB will be stored in MySql.
Building the back-end on .net 6
IdenetityServer is a commonly used Identity Server that is built on .net. It used to be called IdentittyServer4, now it's Duende.
github.com/DuendeSoftware/Duende.AccessToke..
The most commonly used method is installing templates as part of .net and using the following commands to install templates.
dotnet new --install Duende.IdentityServer.Templates
Then use the following command to this to create a project using the template
dotnet new %TemplateShortName% -n %ProjectName%
Duende Provides the following templates:
bffjs -> Duende BFF (Back to Front) with JavaScript
isempty -> Duende IdentityServer Empty
isui -> Duende IdentityServer Quickstart UI (UI assets only)
isaspid -> Duende IdentityServer with ASP.NET Core Identity
isef -> Duende IdentityServer with Entity Framework Stores
isinemem -> Duende IdentityServer with In-Memory Stores and Test Users
You can use the following CLI command to list all templates
dotnet new --list
I tried to generate the project with each of these and only isef worked for me with MySql but there were still massive issues with seeding the project. From everything I've seen, it looks like it works like a charm with SQL Server.
Definite steps to get Duende to work on MySql:
Clone the Duende git repository
git clone https://github.com/DuendeSoftware/Duende.AccessTokenManagement.git
Create a DB Schema using MySql Workbench and retrieve info necessary for connection string
MySql Connection string example
"server=localhost;port=3306;database=%DBName%;uid=%uid%;password=%password%"
Update connection string and DbProvider in appsettings.json in the following 3 projects.
%ProjectName%.IdentityServer.Admin

%ProjectName%.IdentityServer.Admin.API

%ProjectName%.IdentityServer.STS.Identity
Open a new terminal window at the root of the Project solution and run the following commands. These will generate migrations in the MySql Folder
dotnet ef migrations add DBInit -c AdminIdentityDbContext -o Migrations\Identity -p ..\${projectName}.Admin.EntityFramework.MySql\${projectName}.Admin.EntityFramework.MySql.csproj


dotnet ef migrations add DBInit -c AdminLogDbContext -o Migrations\Logging -p ..\${projectName}.Admin.EntityFramework.MySql\${projectName}.Admin.EntityFramework.MySql.csproj


dotnet ef migrations add DBInit -c IdentityServerConfigurationDbContext -o Migrations\IdentityServerConfiguration -p ..\${projectName}.Admin.EntityFramework.MySql\${projectName}.Admin.EntityFramework.MySql.csproj


dotnet ef migrations add DBInit -c IdentityServerPersistedGrantDbContext -o Migrations\IdentityServerGrants -p ..\${projectName}.Admin.EntityFramework.MySql\${projectName}.Admin.EntityFramework.MySql.csproj


dotnet ef migrations add DBInit -c AdminAuditLogDbContext -o Migrations\AuditLogging -p ..\${projectName}.Admin.EntityFramework.MySql\${projectName}.Admin.EntityFramework.MySql.csproj


dotnet ef migrations add DBInit -c IdentityServerDataProtectionDbContext -o Migrations\DataProtection -p ..\${projectName}.Admin.EntityFramework.MySql\${projectName}.Admin.EntityFramework.MySql.csproj
Update the DB using each individual DbContext
dotnet ef database update -c AdminIdentityDbContext

dotnet ef database update -c AdminLogDbContext

dotnet ef database update -c IdentityServerConfigurationDbContext

dotnet ef database update -c IdentityServerPersistedGrantDbContext

dotnet ef database update -c AdminAuditLogDbContext

dotnet ef database update -c IdentityServerDataProtectionDbContext
Update the Startup.cs file so that the backend is connected with the DbContext you've just created.
In the function ConfigureServices add the following lines of code
 var connectionString = Configuration.GetConnectionString("DefaultConnection");

 // Adds the Duende IdentityServer Admin UI with custom options.
services.AddIdentityServerAdminUI<AdminIdentityDbContext, IdentityServerConfigurationDbContext, IdentityServerPersistedGrantDbContext,
AdminLogDbContext, AdminAuditLogDbContext, AuditLog, IdentityServerDataProtectionDbContext,
UserIdentity, UserIdentityRole, UserIdentityUserClaim, UserIdentityUserRole,
UserIdentityUserLogin, UserIdentityRoleClaim, UserIdentityUserToken, string,
IdentityUserDto, IdentityRoleDto, IdentityUsersDto, IdentityRolesDto, IdentityUserRolesDto,
IdentityUserClaimsDto, IdentityUserProviderDto, IdentityUserProvidersDto, IdentityUserChangePasswordDto,
IdentityRoleClaimsDto, IdentityUserClaimDto, IdentityRoleClaimDto>(ConfigureUIOptions);
Seed the Db using the following command:
dotnet run /seed
Now you should have a fully built Db seeded with data and you should be able to run the solution with the 3 startup projects