

This article is a follow-up to the article Creating a token server, STS, API using .net 6, MySql and Duende Identity Server. It is highly recommended that you follow that article first.
General OAuth and OIDC Concepts
Authentication, identification, and authorization management are central to modern CAT applications and in the overall management of information systems.
OAuth 2.0 is the modern standard protocol for managing permissions. Unfortunately, there is no standard implementation for OAuth 2.0, so different implementations use different methods.
OpenID Connect (OIDC) is an identity management implementation layer based on OAuth 2.0. It normalizes the protocol via REST API to standardize the retrieval of credentials.
The result is that the consumer can switch OIDC providers without writing a single piece of code. It also allows you to make OAuth 2.0 compatible with your old authentication systems. It can act as an interface.
BASICS: Identification vs. authorization vs. authentication
It is necessary to master the distinction between these concepts because this vocabulary is important to understand the article.
Identification: Who are you? Example: Login
Who can be authenticated? It is often either a person or a machine.Authentication: Are you really that person/machine? Example: Password.
Authorization: Does this person/machine have the right to access this resource?
BASICS: HTTP Responses
Authentication Response code HTTP 401, if I am not authenticated and trying to access a private resource
Authorization Response code HTTP 403, I am authenticated but I do not have the right to access the resource
Identification It can be carried out in many different ways (form, certificate, validation by an application, etc.). If you make an identification request via a web form: Response code HTTP 400, the information I send by form via HTTP POST is not valid.
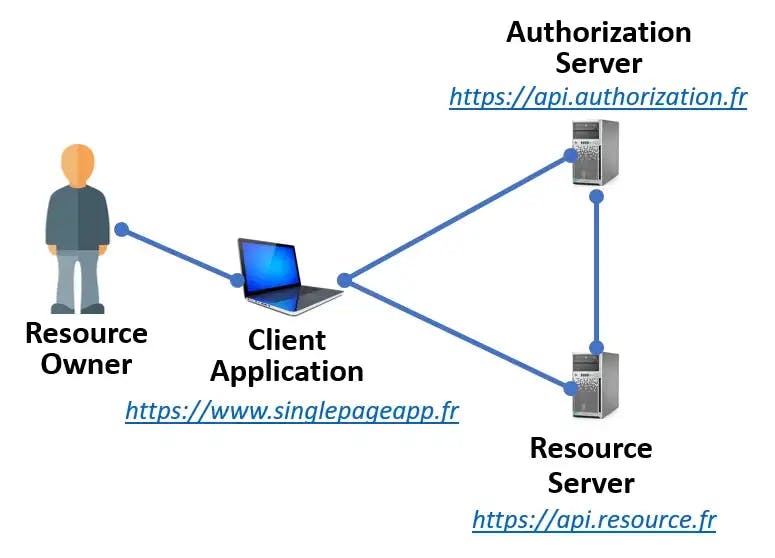
BASICS: OAuth 2 .0 Roles
Resource Owner: A human or a machine
Resource Server: Hosts data that is protected for access
Client Application: An application requesting data from the resource server.
Authorization Server: Issues access tokens to the client.
WHY OIDC and not OAuth?
OpenID Connect standardizes
User information retrieval
An API (User Info endpoint)
Using the ID Token Scope
Authentication
SSO session management (ex: Single Logout)
An OpenID server discovery system, through the use of a “/.well-known” URL; a “/.well-known” URL that lists all other URLs.
All this allows you to change OIDC providers without changing your code
The REST API is simple and standardized:
authorization: to authenticate a user
token: to request a token (access/refresh/ID)
user info: to retrieve user information (identity, rights)
revocation: to revoke a token (access/refresh)
introspection: to validate a token (access/refresh)
Implementing OIDC for BHIS using @axa-fr/react-oidc
Since the Token Server is based on (Skoruba) Duende Identity (.net standard token server) in correlation with ASP.Identity: I sought a node package that could take care of that in react. Research led to the @axa-fr/react-oidc module. These are the reasons I chose this module:
Secure :
With the use of Service Worker, your tokens (refresh_token and access_token) are not accessible to the javascript client code (big protection against XSRF attacks)
OIDC using client-side Code Credential Grant with PKCE only
Lightweight
Simple :
refresh_token and access_token are auto-refreshed in the background
with the use of the Service Worker, you do not need to inject the access_token in every fetch
No cookie problems: You can disable silent sign-in (that internally uses an iframe).
Multiple Authentication :
You can authenticate many times to the same provider with different scopes
You can authenticate to multiple different providers inside the same SPA (single page application) Website
Flexible :
- Work with Service Worker (more secure) and without for older browser (less secure)
Compatible with:
Google
AWS
All OIDC-compatible providers
AXA React OIDC
React OIDC V4 allows you to use the “Authorization Code Grant with PCKE” flow on the client side. This flow is sensitive to XSS-type attacks.
@axa-fr/react-oidc offers is a mode that utilizes a "ServiceWorker" acting as a proxy between the client and the server. It allows the "access_token" and "refresh_token" codes to be completely hidden from the Javascript client code. The "ServiceWorker" is able to automatically inject your "access_token" in your requests to your API as well as the "refresh_token" in requests to the OIDC server.

Implementation
Download the Demo and install the dependencies
$ git clone https://github.com/AxaGuilDEv/react-oidc.git
$ cd react-oidc/packages/react
$ npm install
$ npm start
# then navigate to http://localhost:4200
I wrote an article NPM vs YARN vs PNPM and more on dependency resolution. This article can help with resolving dependency conflicts.
Set up Code
The only file you should edit is "OidcTrustedDomains.js".
const trustedDomains = {
  // use the url for the Identity Server Admin and the STS
  default: ['https://localhost:44310', 'https://localhost:44303']
};
Set up the OIDC client Configuration
In the App.tsx file add the following imports:
import  { OidcProvider }  from '@axa-fr/react-oidc';
import { OidcSecure } from '@axa-fr/react-oidc';
import { TokenRenewMode } from '@axa-fr/react-oidc';
Add the following configuration, which defines the OIDC client in configuration.ts at the root of the demo project
export const configurationIdentityServer = {
    client_id: 'react-oidc-twilio-client',
    redirect_uri: window.location.origin + '/authentication/callback',
    silent_redirect_uri: window.location.origin + '/authentication/silent-callback',
    silent_login_uri: window.location.origin + '/authentication/silent-login',
    scope: 'openid profile',
    authority: 'https://localhost:44310',
    refresh_time_before_tokens_expiration_in_second: 40,
    // service_worker_relative_url: './OidcServiceWorker.js',
    service_worker_only: false,
    monitor_session: true,
    token_renew_mode: TokenRenewMode.access_token_invalid,
  };
IMPORTANT NOTE
The configuration setup here must match the configuration setup on the server side value to value.
Log on to the Identity Server and Add a client with the same client_id, redirect URIs, scope, and response type. The Service worker can take some time to set up. I recommend documenting the service_worker_relative_url and setting service_worker_only to FALSE. Once the client is verified start implementing the Service Worker.
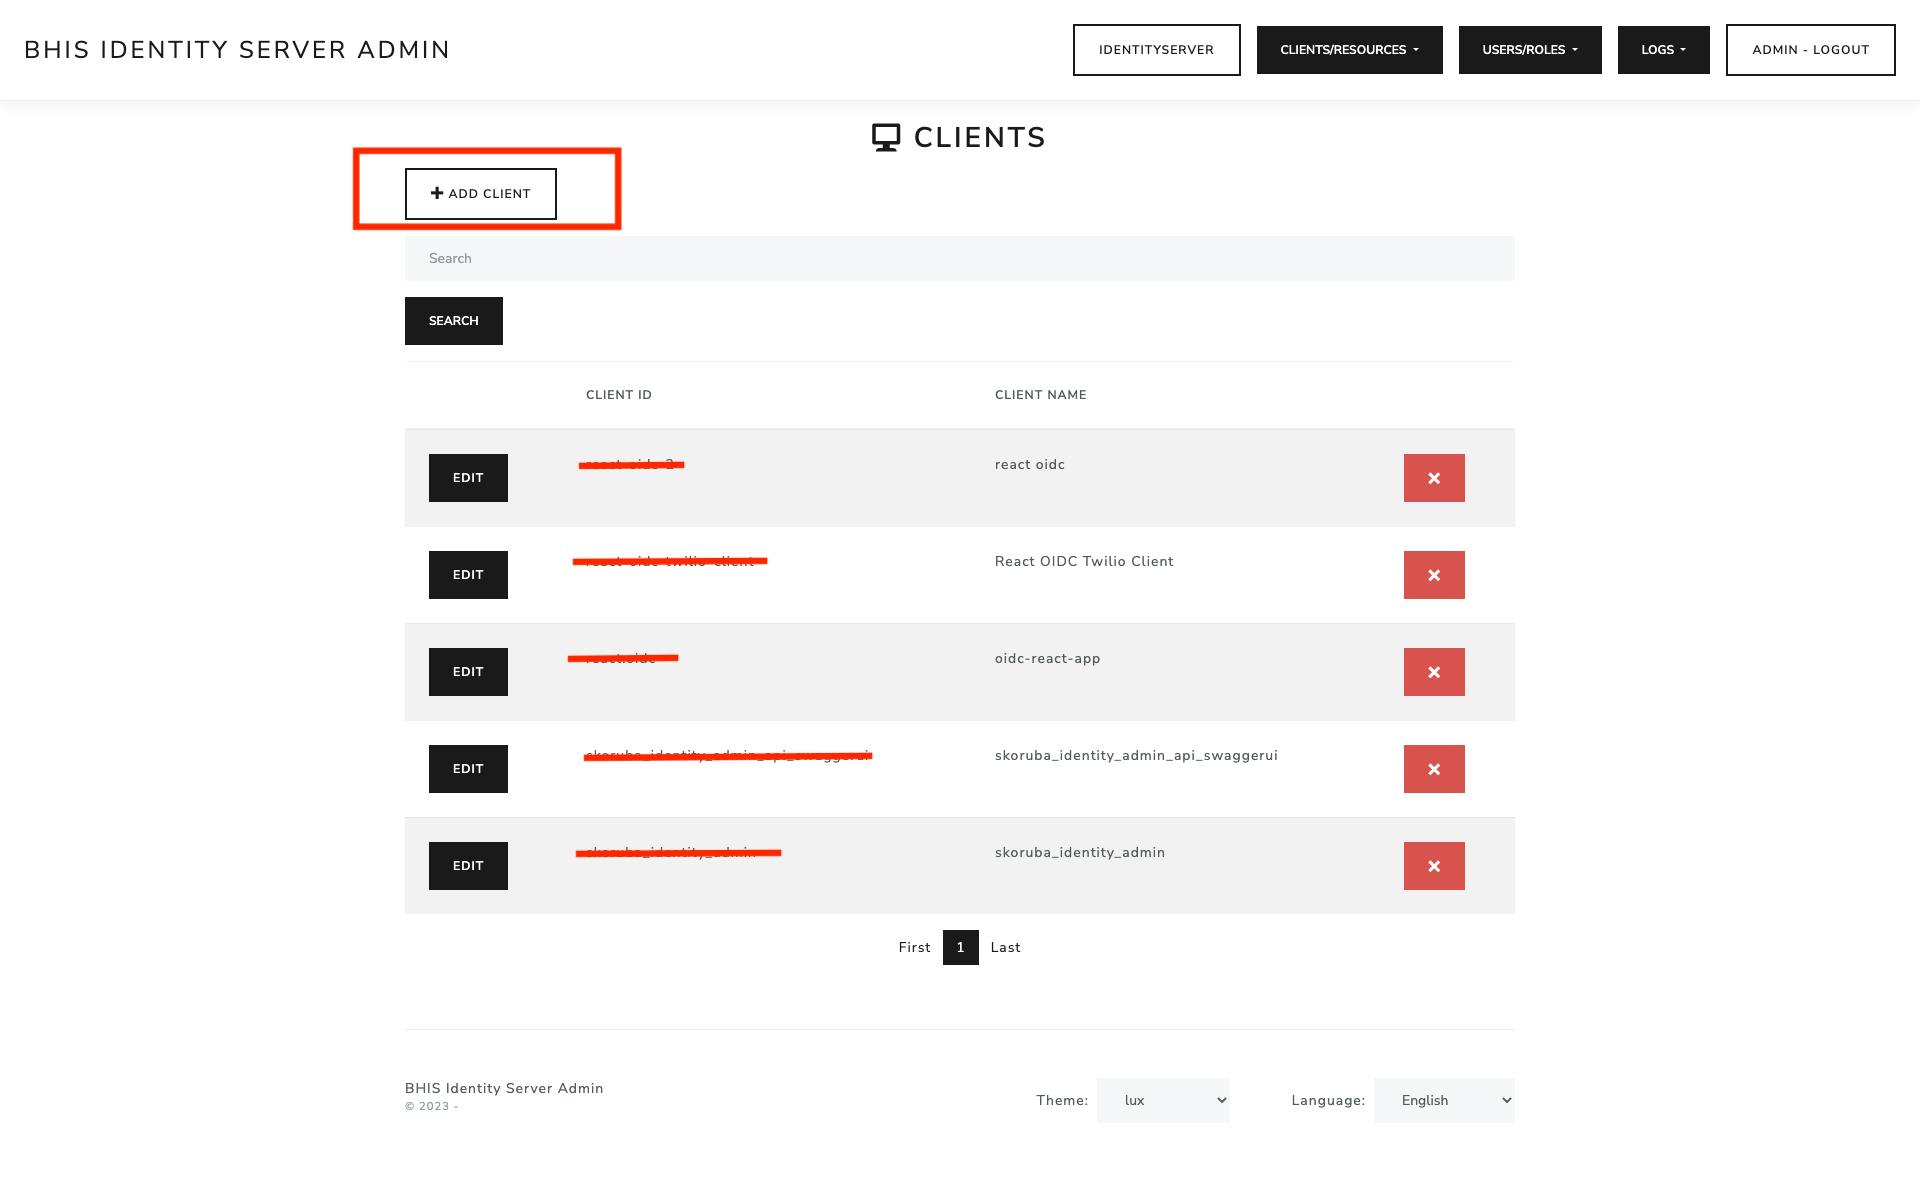
Create a new Client on the Server Side.
Go to Clients- > Add Client

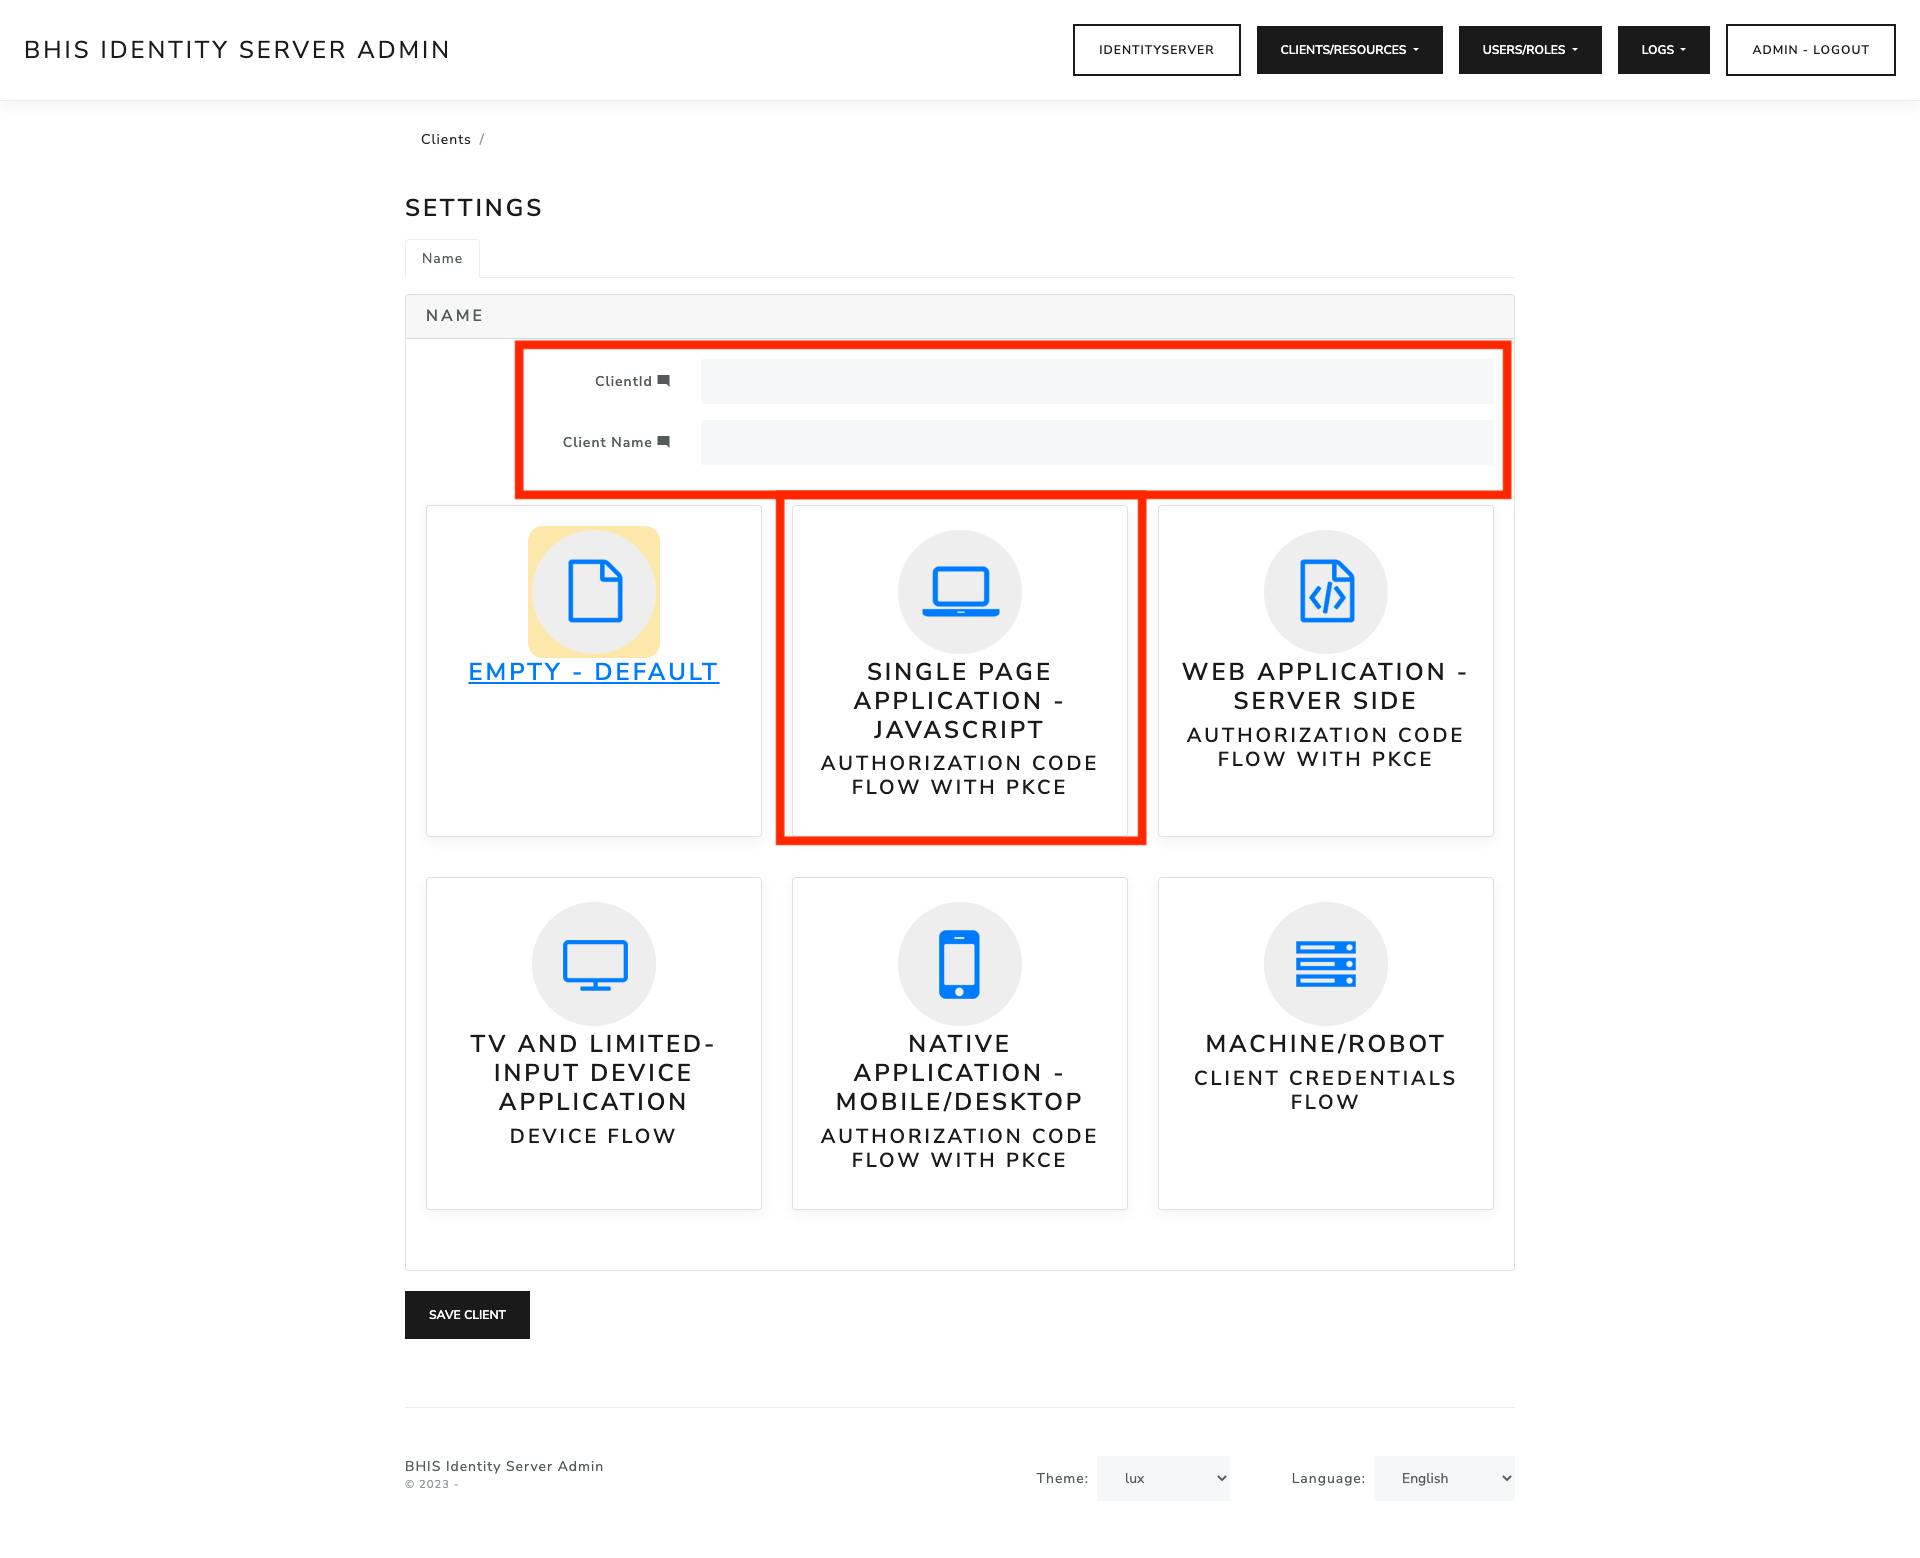
Choose the appropriate Client Type, for this project SPA
Important Note
Client ID must match client_id in the OIDC configuration
NOTE
Turn on the options: Enabled, Require PKCE, Allow Plain Text PKCE, Allow Offline Access, Allow Access Token via Browser
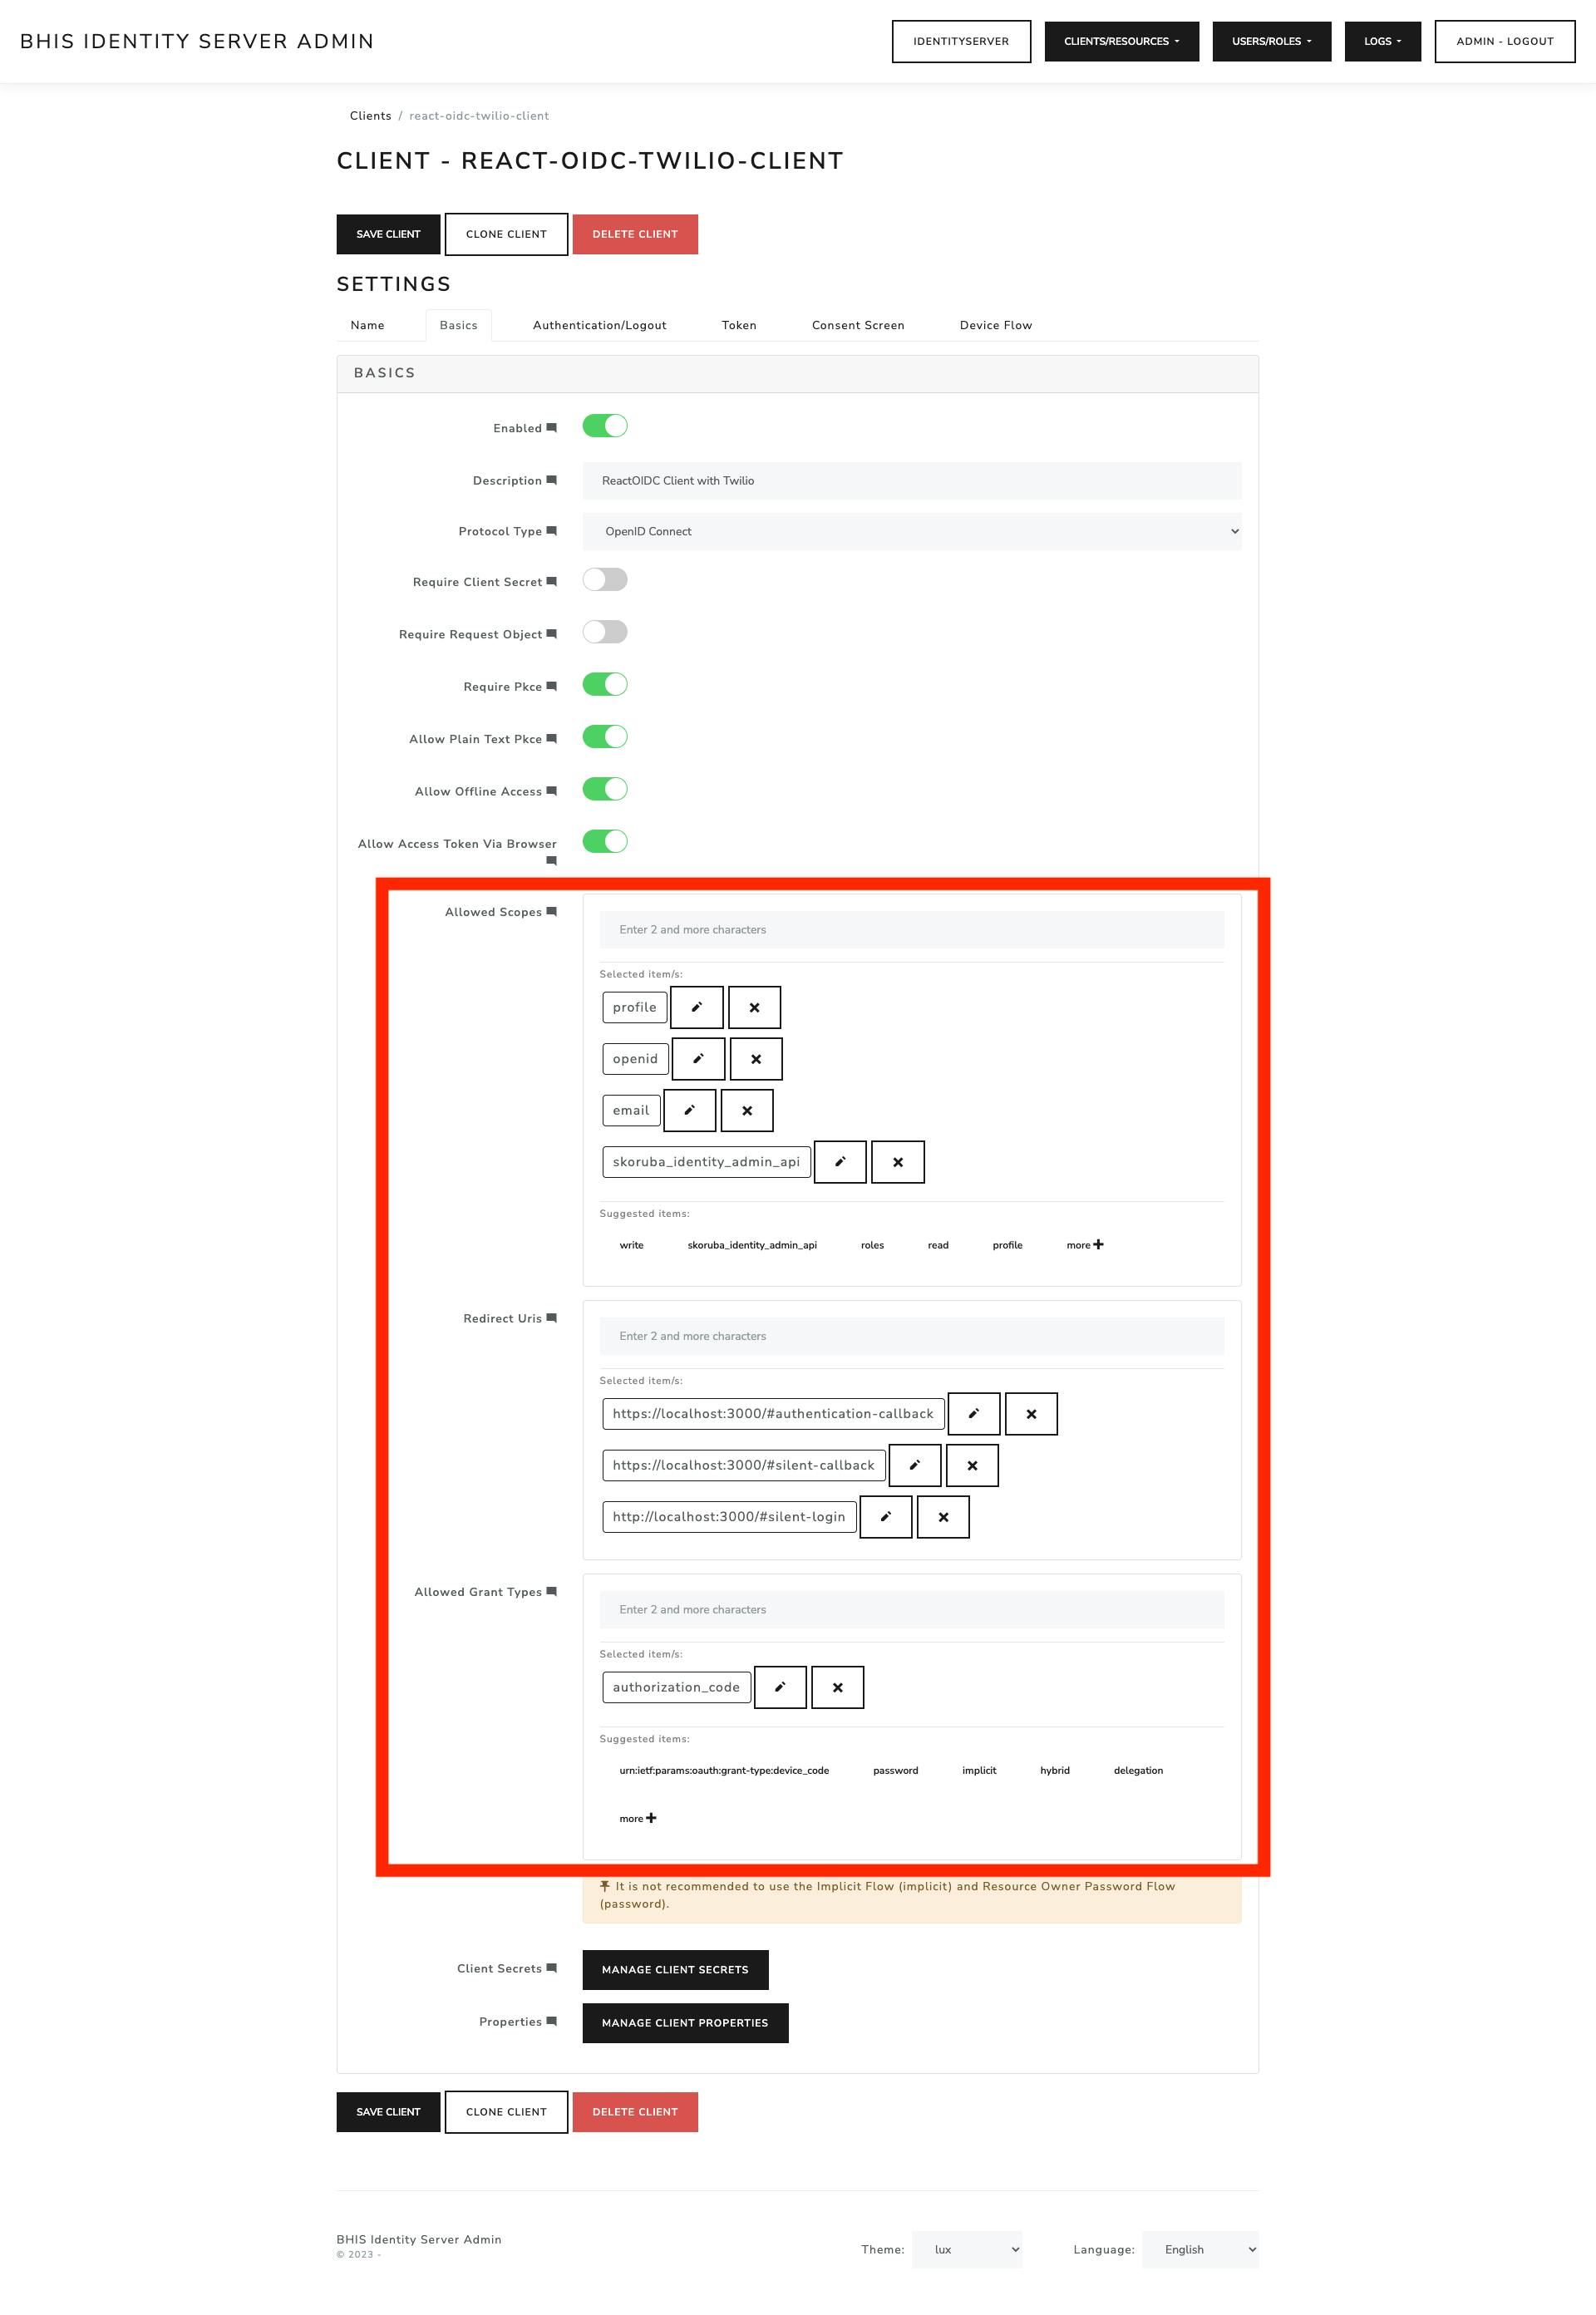
Here is the config section that covers the 3 highlighted fields
  redirect_uri: window.location.origin + '/#authentication-callback',
  silent_redirect_uri: window.location.origin + '/#silent-callback',
  silent_login_uri: window.location.origin + '/#silent-login',

  scope: 'openid profile email skoruba_identity_admin_api offline_access',

  response_type: 'code id_token token',
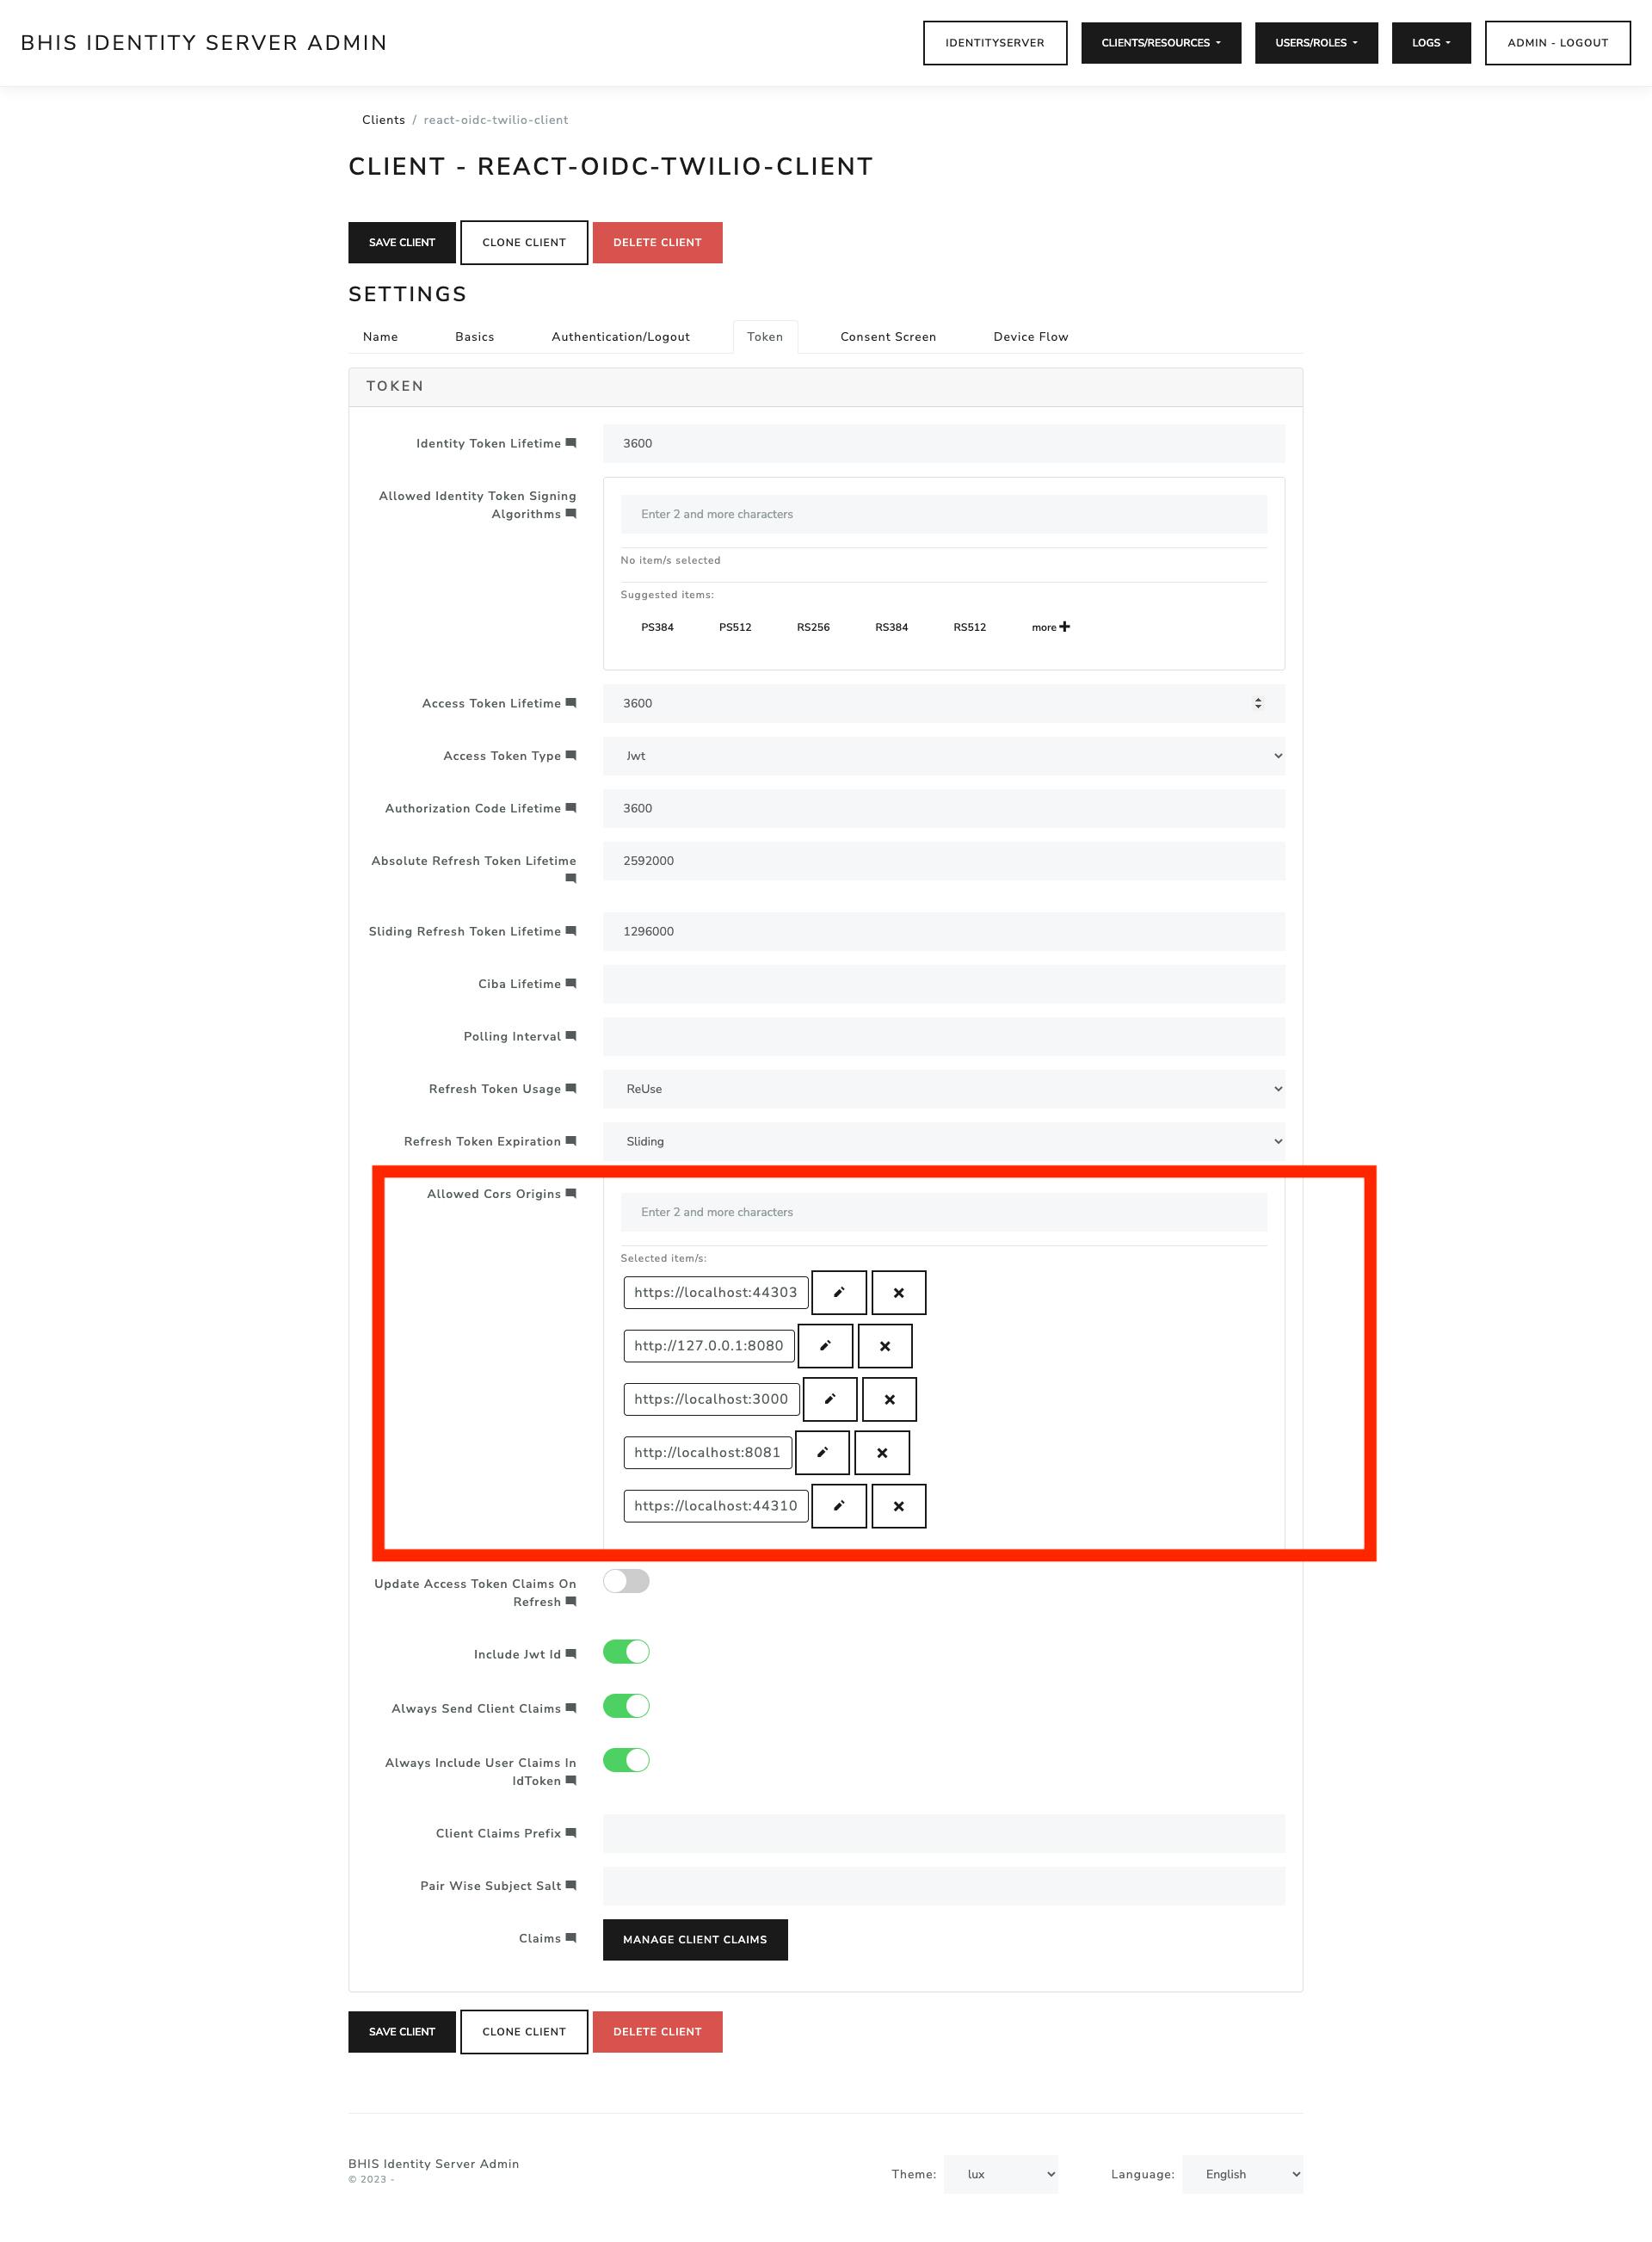
You can set up CORS by adding the URLs you would like to white list in the Allowed CORS Origin field.
SSL Security
Server Side SSL
In order to run the code you need to secure both the client and the server. For the server-side code, open a new terminal at the root of the project.
$ dotnet dev-certs https --trustClient Side SSL
1. Install mkcert using brew
$ brew install mkcert2. Create a local certificate authority(Ca) by running the following command.
$ mkcert -install3. Run the following to generate the certificate and store it in the root folder of the project.
$ mkcert -key-file ./reactcert/key.pem -cert-file ./reactcert/cert.pem "localhost"4. Configure React to Use SSL
In package.json, add a path that points to the SSL certificates."scripts": { "start": "HTTPS=true SSL_CRT_FILE=./reactcert/cert.pem SSL_KEY_FILE=./reactcert/key.pem react-scripts start" }Now when the code is run using npm start it will set HTTPS to true and use the generated certificate to secure the client.
Testing OIDC connection with React
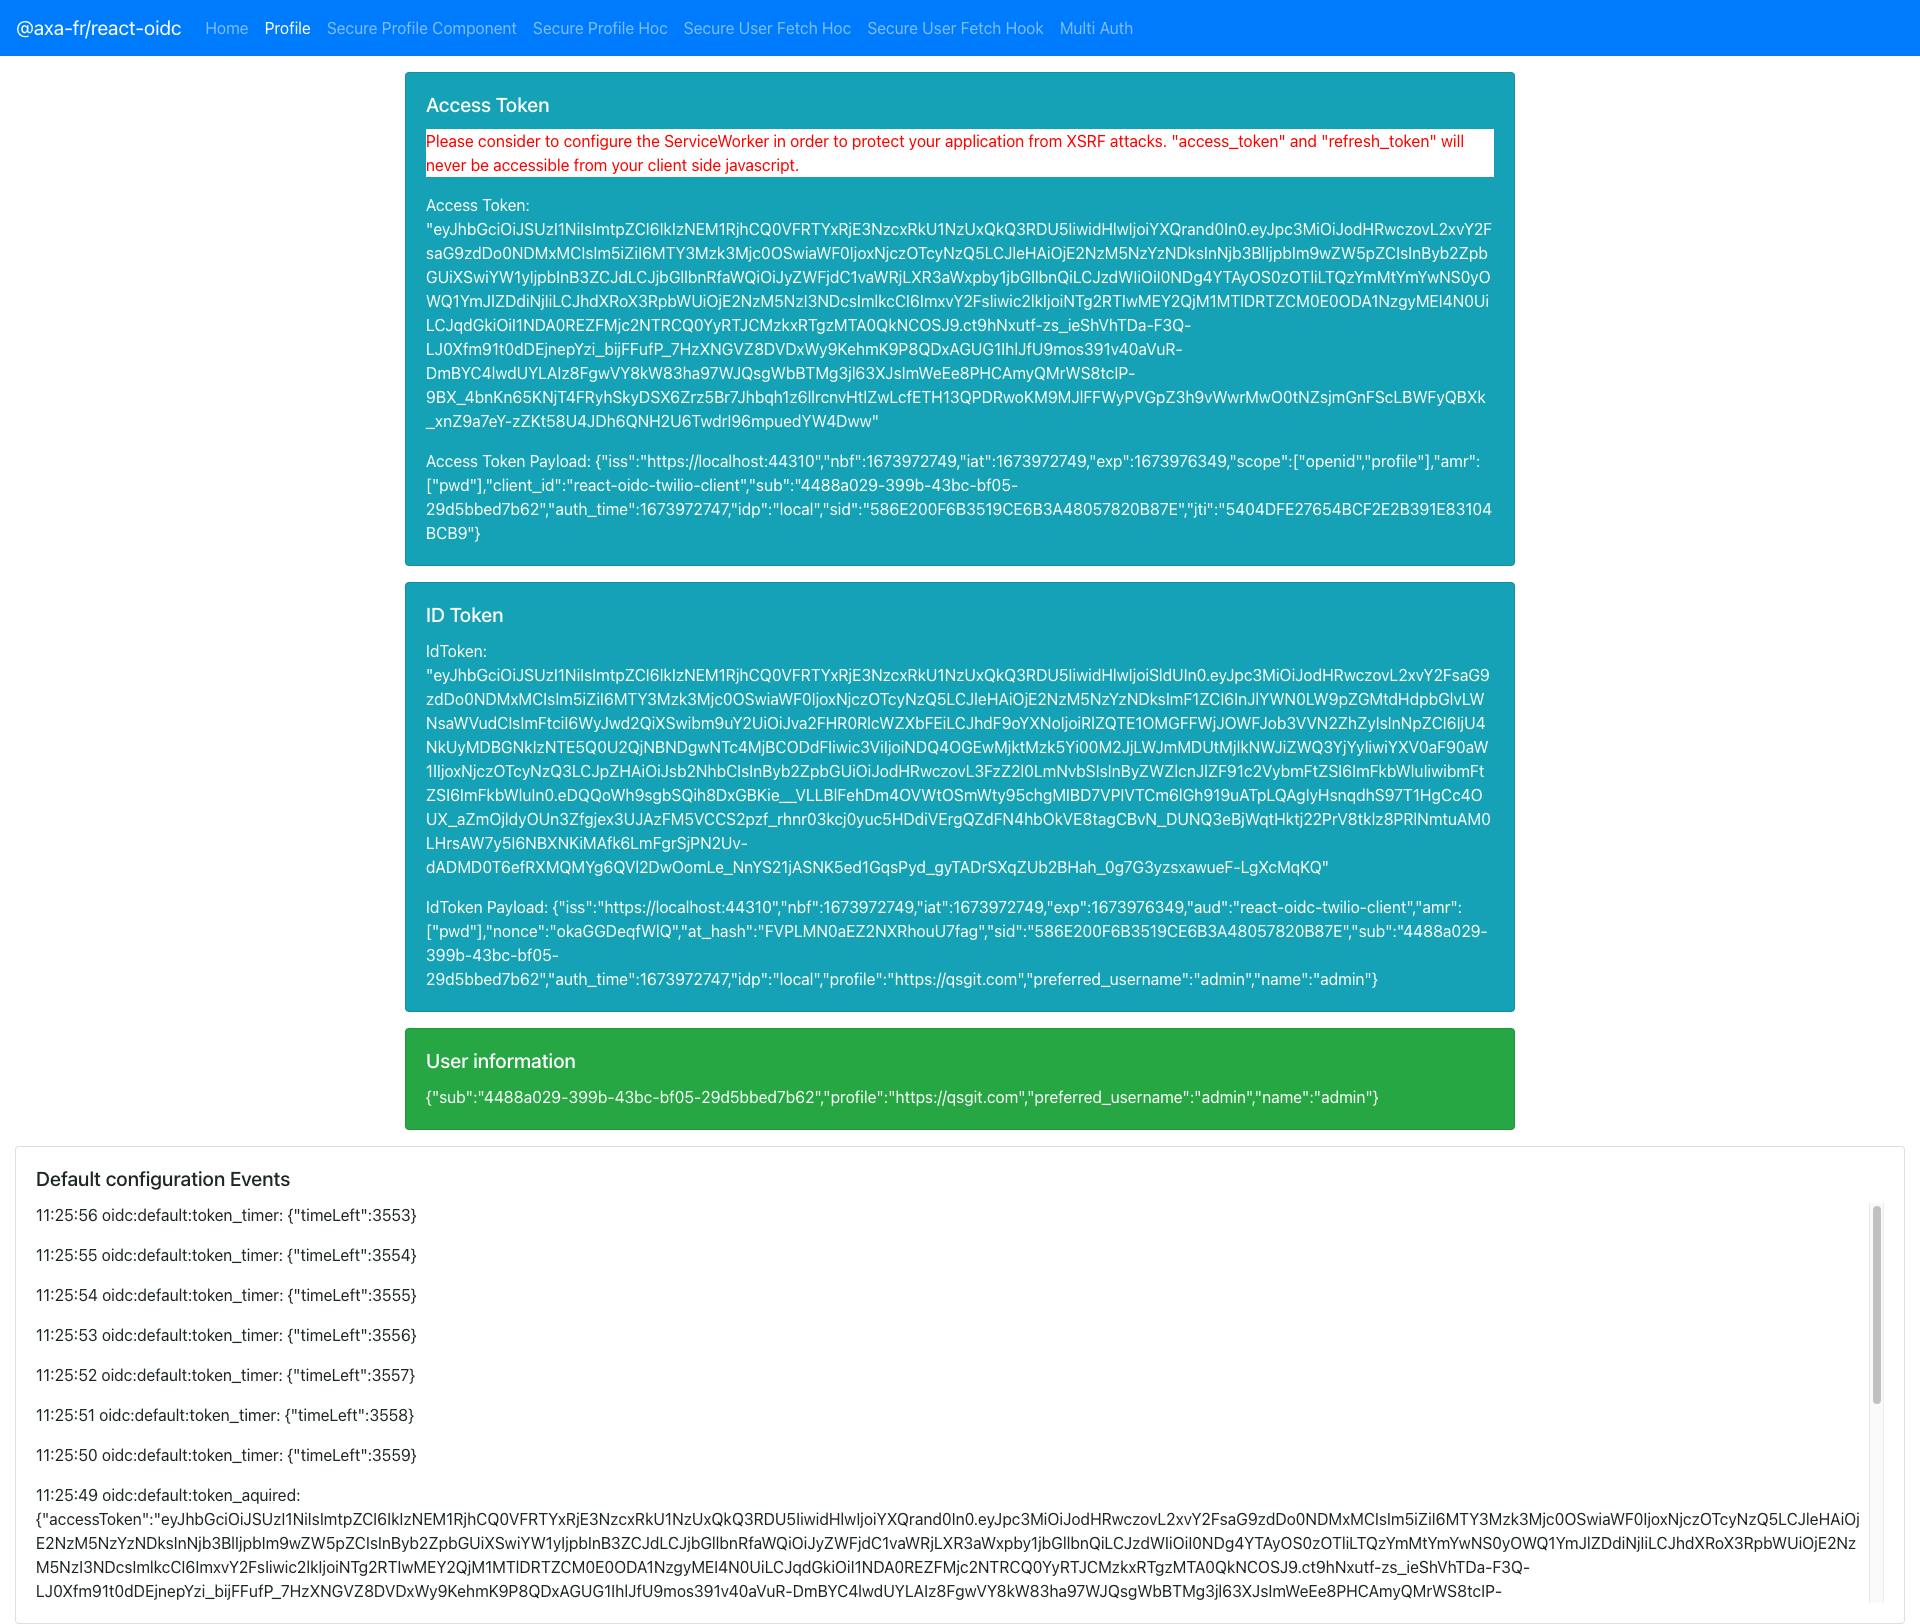
Luckily the react-oidc package comes with a demo that you can use to test the project. You can use this demo to test the client you've created to ensure that the client and server are capable of signing in, refreshing tokens, and retrieving Identity.
Run the demo code using
$ npm start
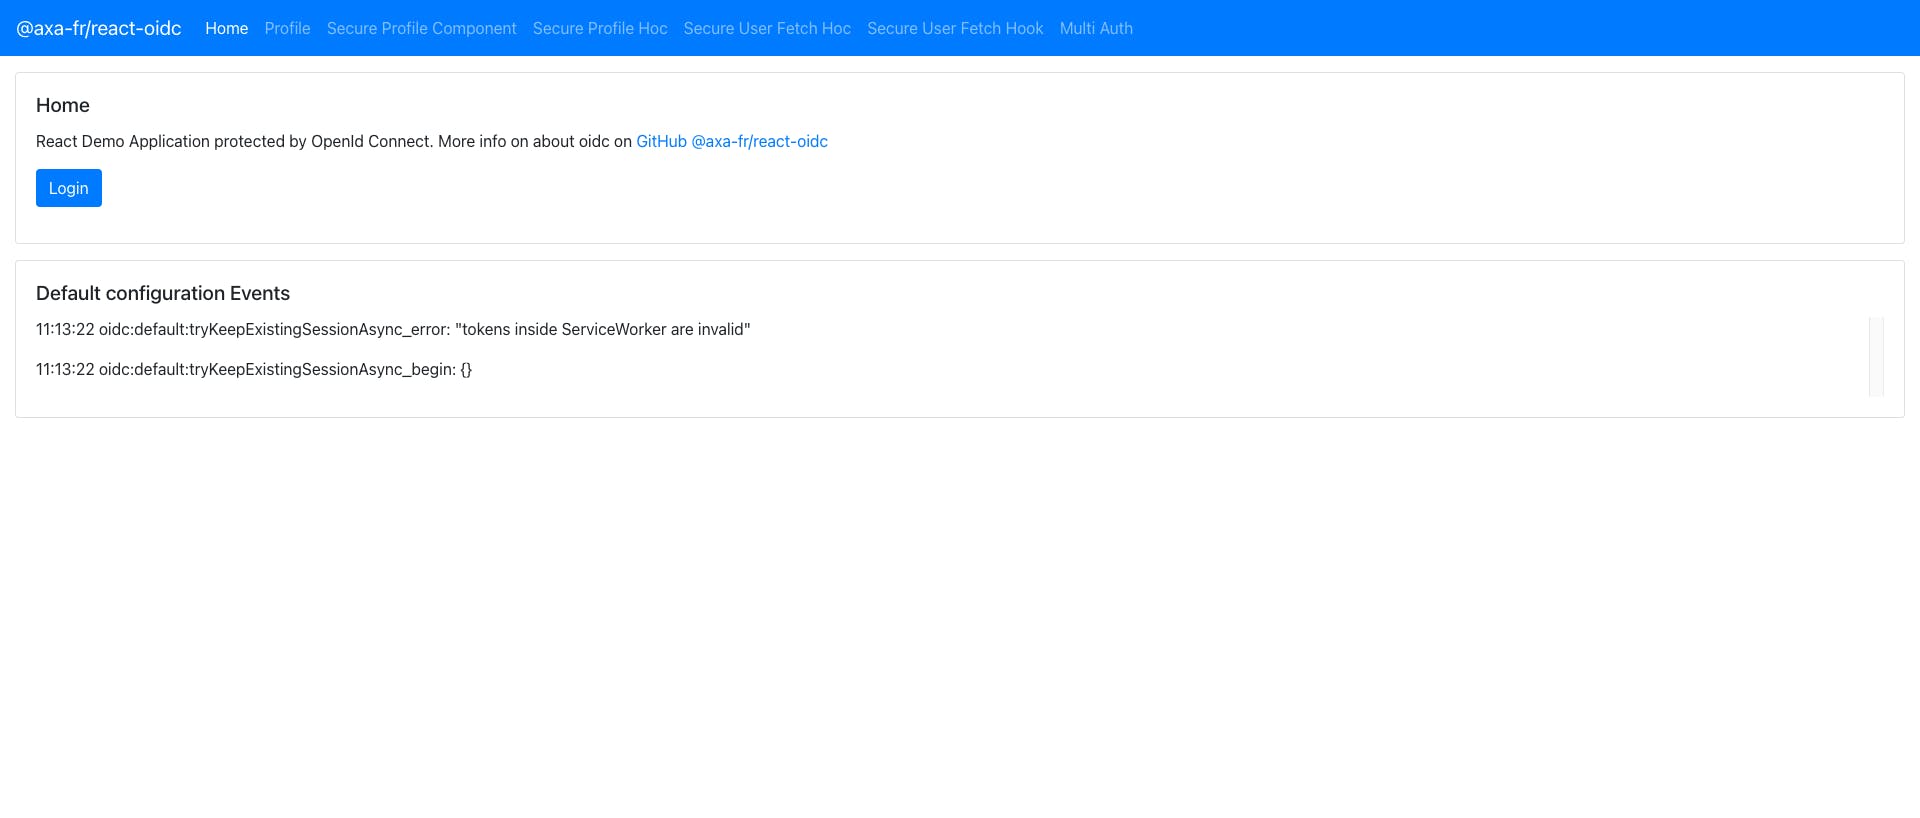
Once you click on the Login Button, if not logged in, you will be redirected to the Identity Server Login, otherwise, you will be returned to the page.

If everything works, you should be redirected to the index page with the Access Token, ID token, and User information